4. PyQT and Interacting With QGIS
So far, so good. We’re now able to install our freshly created plugin to the local QGIS installation using one simple command. We can also enable the plugin in QGIS and see that it was activated.
First of all, we need to design an user interface. This is best done using QT Designer. Let’s go ahead and load the only *.ui file in the repository, my was named geoapify_plugin_dockwidget_base.ui:
 The QDockWidget with dummy text is what the Plugin Builder plugin generates by default when you choose the Tool button with dock widget template. If you’re not sure what Plugin Builder is, check out my previous article.
Let’s reiterate on what the plugin should be able to do:
We will develop a simple QGIS toolbar to create a point vector layer using a text-based location search.1
Since the Geoapify API needs an API key, we’ve got to ask the user for it somehow. In our dock widget, we’re adding a text prompt for the address, and also a simple table to show the search results. After double-clicking on a specific row, the search result will be added to the main QGIS canvas.
Here is what I’ve been able to sketch up after a few minutes:
 The first dock widget draft. Make sure to name your components appropriately - we will refer to components in our code using the objectName attribute.
Now, let’s circle back to the first part of this series1 - checking in on our features using issue tracking on GitLab. When creating a commit message, we’ll tag the issue number along with the keyword closes, something like this:
1
2
3
4
5
6
7
8
9
10
11
12
13
14
15
16

design dock widget using QT Designer: simple search form + search result table
closes #1

# Please enter the commit message for your changes. Lines starting
# with '#' will be ignored, and an empty message aborts the commit.
#
# Date:      Sat Jan 27 20:33:20 2024 +0100
#
# On branch design_dock_widget
# Your branch is up to date with 'origin/design_dock_widget'.
#
# Changes to be committed:
#       modified:   qgisapify/geoapify_plugin_dockwidget_base.ui
#
The closes #1 is what Gitlab calls a closing pattern. What this means in practice is that once the feature branch is merged into main, the issue gets automatically closed.
Now is the time to connect our UI with the Python code. Copy-pasting what we had in QT Designer, let’s modify geoapify_plugin_dockwidget.py:
1
2
3
4
5
6
7
8
9
10
11
12
13
14
15
16
17
18
19
20
21
22
23
24
25
26
27
28
29
30
31
32
33
34
35
36
37
38
39
40
41
42
43
44
45
46
47
48
49
50
51

import os

from qgis.core import Qgis
from qgis.PyQt import QtWidgets, uic
from qgis.PyQt.QtCore import pyqtSignal
from PyQt5.QtWidgets import QLabel, QLineEdit, QPushButton, QTableWidget
from PyQt5.QtCore import pyqtSlot

from qgis.gui import QgisInterface

FORM_CLASS, _ = uic.loadUiType(os.path.join(
    os.path.dirname(__file__), 'geoapify_plugin_dockwidget_base.ui'))


class GeoapifyPluginDockWidget(QtWidgets.QDockWidget, FORM_CLASS):

    """
    Wire up UI components to Python code.
    """
    addressLabel: QLabel
    addressLineEdit: QLineEdit
    apiKeyLabel: QLabel
    apiKeyLineEdit: QLineEdit
    searchButton: QPushButton
    resultTableWidget: QTableWidget

    closingPlugin = pyqtSignal()

    def __init__(self, iface: QgisInterface, parent=None):
        """Constructor."""
        super(GeoapifyPluginDockWidget, self).__init__(parent)
        self.iface = iface
        self.setupUi(self)
        # connect signal to our slot
        self.searchButton.clicked.connect(self.__handleSearchButtonClick)


    """
    This is our auxiliary logic to make sure we've wired up QT
    components correctly.
    """
    def __handleSearchButtonClick(self):
        address = self.addressLineEdit.text()
        api_key = self.apiKeyLineEdit.text()
        self.iface.messageBar().pushMessage("Test", f"Testing the plugin: address {address}, api_key {api_key}", level=Qgis.Info, duration=3)

    def closeEvent(self, event):
        self.closingPlugin.emit()
        event.accept()
If you’re not familiar with QT, the key thing to know is how it lets us hook up functionality based on what the user does. QT allows us to respond to user actions through signals. When a signal is sent out, all the listeners get notified about a new event, e.g. when a user clicks a button.
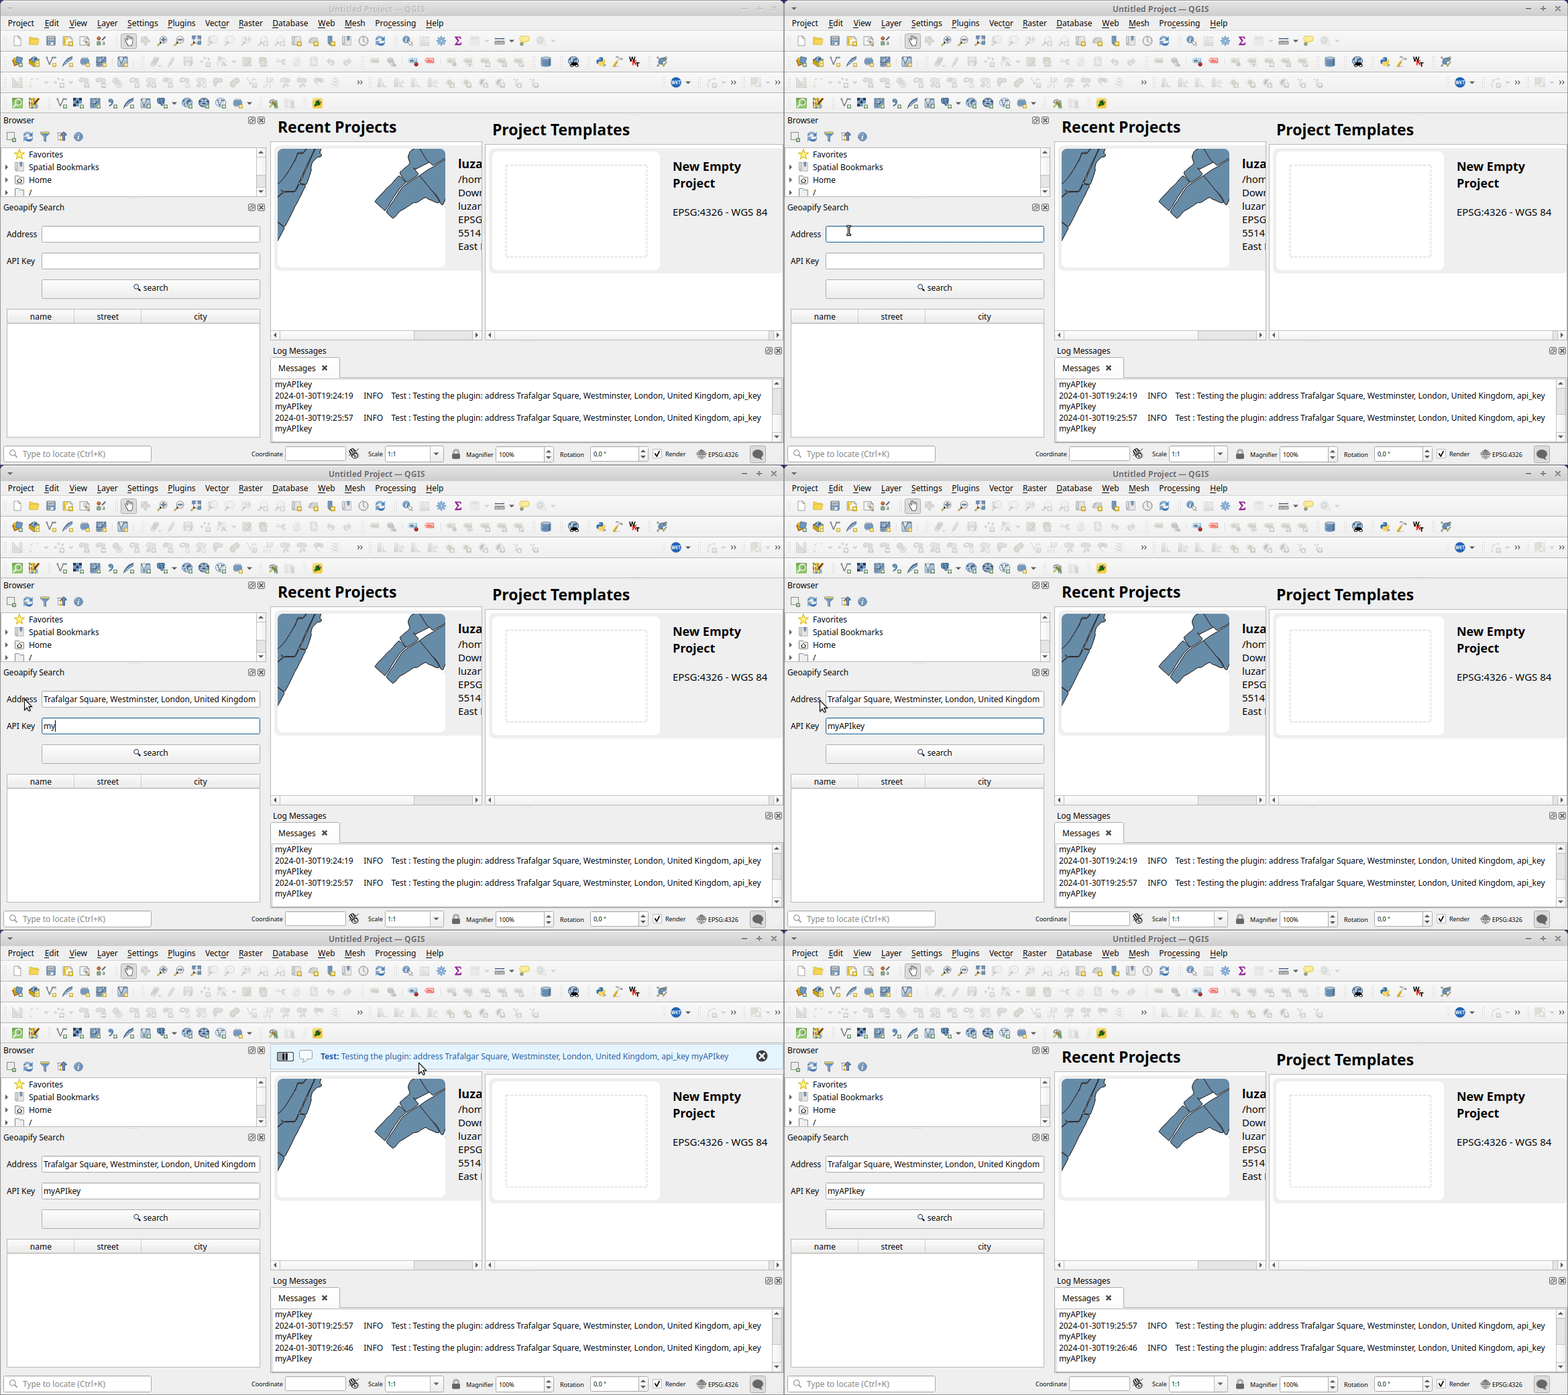
That’s what our code does: whenever a click signal is triggered for the searchButton component, it triggers the execution of the __handleSearchButtonClick function – precisely what we need! In our simplistic implementation, a new message is pushed to QGIS, appearing in the message bar. Subsequent enhancements will involve sending a request to Geoapify containing the user prompt.
Let’s try the plugin logic in action:
In the next part, we will focus on connecting our Geoapify client with the plugin logic.
