6. Form Validation, Testing, Workers
We now have a “sort of working” implementation but we still have a lot of work ahead of us as the implementation is far from being functional and usable by others.
Form Validation
First of all, we would like to tell the user that both text fields are mandatory. We can do this by enabling the search button if and only if both text fields are filled in, like so:
1
2
3
4
5
6
7
8
9
10
11
12
13
14
15
16
17
18
19
20
21
22
23
24
25
26
27

class GeoapifyPluginDockWidget(...):
    ...
    def __init__(self, iface: QgisInterface, parent=None):
        super(GeoapifyPluginDockWidget, self).__init__(parent)
        ...

        self.addressLineEdit.textChanged.connect(self.__onTextChange)
        self.apiKeyLineEdit.textChanged.connect(self.__onTextChange)

        ...

    def __onTextChange(self) -> None:
        self.searchButton.setEnabled(self.__isFormComplete())

    def __isFormComplete(self) -> bool:
        # check that all text fields have a nonblank value
        return all(
            [
                self.__hasAnyContent(linedit)
                for lineedit in [self.addressLineEdit, self.apiKeyLineEdit]
            ]
        )

    def __hasAnyContent(self, lineEdit: QLineEdit) -> bool:
        len(lineEdit.text().strip()) > 0
In QT Designer, I also turned off the search button by default so that we correctly deal with the initial state of the form.
Of course, you could verify your functionality manually by expecting whether the button is disabled or not on various user inputs. To make 100 % sure our functionality will not break even if with future code changes, we need to … write tests!
We need to do some plumbing and boilerplate first, though. The good news is that this setup will be fairly simple, no matter how complex your plugin is.
Test preparations
First, create a file in the root project directory named test.Dockerfile with the following contents:
1
2
3
4
5
6
7
8
9
10
11
12
13
14
15
16
17
18
19
20
21
22
23
24
25
26
27
28
29
30
31
32
33
34
35
36
37
38
39
40
41
42
43
44
45
46
47
48
49
50
51
52
53
54
55
56
57
58
59
60
61
62

# We base our image on the image publicly available at the Docker Hub:
# https://hub.docker.com/r/qgis/qgis
FROM qgis/qgis:final-3_34_3

# The name of the user under which we will execute our tests.
ARG USER_NAME=qgis-tester
# Plugin name. Apart from the QGIS image version, This is probably
# the only argument you will need to modify.
# The name should also match the name of the source root directory.
ARG PLUGIN_NAME=qgisapify
# The root directory of the test suites we would like to execute.
# We're not setting any value here deliberately since this is the only
# variable which needs to be specified by the test executor.
#
# In our case, it makes little sense to create two separate Dockerfiles,
# i.e. one for unit tests and the second one for integration tests.
# It is quite likely, though, that if setup for your tests starts
# drifting away for each test type, split this one Dockerfile into many.
ARG TESTS_ROOT

# We want headless QGIS since we don't need to interact with
# the graphical interface.
ENV QT_QPA_PLATFORM=offscreen

# This is a little trickery I needed to do in order for the geopandas
# dependency to work. Ignore this if you're not using geopandas.
RUN pip3 install --upgrade --force-reinstall numpy

# Add a new user and configure its privileges.
# Also note that we're chaining all the shell commands into one RUN;
# this is a good practice to reduce the complexity of the resulting image.
RUN useradd -ms /bin/bash $USER_NAME &&\
    apt-get update &&\
    apt-get install -y build-essential python3-venv &&\
    pip3 install --upgrade numpy

# Switch to the new user. We want to avoid running
# our tests as a "god" superuser because in reality, the plugin
# will be most likely also run under a regular user.
USER $USER_NAME

# Set the working directory to the home directory of our new user.
# This is where we will copy all of your plugin code.
WORKDIR /home/${USER_NAME}

# Copy all requirements TXT files which declare Python module dependencies
# of our plugin. Dependencies will be installed using pip.
COPY --chown=${USER_NAME}:${USER_NAME} ./requirements /home/${USER_NAME}/requirements/

# Install the Python dependencies.
RUN mkdir -p /home/${USER_NAME}/requirements /home/${USER_NAME}/tests /home/${USER_NAME}/${PLUGIN_NAME} &&\
    pip3 install pytest &&\
    pip3 install -r requirements/tests.txt

# Copy plugin sources and test sources available at path $TESTS_ROOT.
# If you wish, you can merge the two COPY commands into one.
COPY --chown=${USER_NAME}:${USER_NAME} ./$TESTS_ROOT ./$PLUGIN_NAME  ./setup.cfg ./tests/__init__.py  /home/${USER_NAME}/

# Finally, execute tests using pytest.
CMD python3 -m pytest -vvl $TESTS_ROOT
This file is basically a “recipe” of how we will set up our testing environment. If you’re interested in what the individual pieces do and would like to customize the Dockerfile to your needs, the attached comments should help you out.
You might be wondering whether running unit tests in Docker is not an overkill and you are right; it is very much possible that the tests will work if you run them directly, e.g. from you IDE. However, I use this setup mainly for sanity reasons. It is always a good idea to run unit tests in a separate Python virtual environment but unfortunately, I was unable to get the QGIS Python module to work on my bare metal.
Since we need to pass in the TESTS_ROOT variable to the Dockerfile, I’ve also created a simple docker-compose.yml:
1
2
3
4
5
6
7
8
9
10
11
12
13
14
15
16
17

services:
  qgis-unit-test:
    build:
      context: .
      dockerfile: test.Dockerfile
    image: qgisapify/qgis-unit-tests
    environment:
      - TESTS_ROOT=tests/unit
  qgis-integration-test:
    build:
      context: .
      dockerfile: test.Dockerfile
    image: qgisapify/qgis-integration-tests
    environment:
      - TESTS_ROOT=tests/integration
We will revisit this definition later but this is a solid start. In my Makefile, I’ve added the following rule:
1
2
3
4
5

unit-test:
	docker-compose build qgis-unit-test &&\
	docker-compose run qgis-unit-test
We’re now ready to go! First of all, we’re going to write unit tests of our GeoapifyPluginDockWidget so that we’re sure our form validation works even under more edge-case scenarios.
Unit Testing
Unit tests are usually grouped by the component whose correctness we are trying to assert. One such list of tests is usually called a test suite. Each test suite usually has its dedicated file.
In many test suites, there are many things which all test cases have in common so to prevent duplicating code even in our test suites, we can make use of fixtures.
If you want to read up on fixtures in pytest, I highly recommend the related article on the project’s website.
Since we will write a test suite dedicated for GeoapifyPluginDockWidget, it might be a good idea to create the widget object as our first fixture, like so:
1
2
3
4
5

@pytest.fixture
def dockwidget(qgis_iface: QgisInterface) -> GeoapifyPluginDockWidget:
    return GeoapifyPluginDockWidget(iface=qgis_iface)
You might be wondering where we got the qgis_iface from. It is a pytest fixture provided by the package pytest-qgis which sets up all the QGIS fixtures for us.
The main fixture we’re interested in is dockwidget which can be injected into any unit test as its parameter:
1
2
3
4
5

def test_widget_should_have_search_button_turned_off_by_default(
    dockwidget: GeoapifyPluginDockWidget
): assert not dockwidget.searchButton.isEnabled()
We’re using the keyword assert to tell pytest that this is the condition which must be met in order for the given test to pass. When writing your own tests, also make sure that the names of your tests begin with test_, otherwise pytest won’t pick them up, as stated in the documentation.
One also very crucial and important technique used in unit testing is mocking which isolates the component being tested (dockwidget, in our case) from its dependencies. In this case, we need to create a Geoapify client mock which will return a dummy value whenever it’s called.
I want to keep this tutorial snappy and quick so if you’re not sure how to write such tests or how mocking works, I recommend reading the whole test suite through.
Integration Testing
Once we’re done with unit testing, it is now time to check that everything works together.
Let’s create another Make target which will execute our integration tests:
1
2
3
4
5

integration-test:
	docker-compose build qgis-integration-test &&\
		docker-compose run qgis-integration-test
If we stop and think about how our plugin works from a bird’s-eye view, it communicates with two other components:
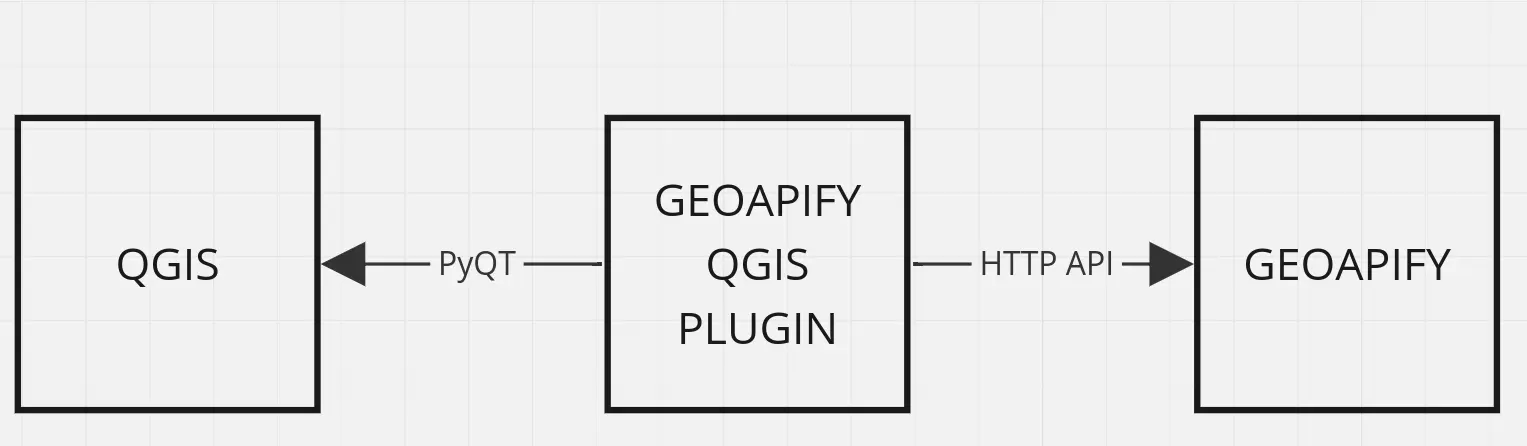
In our unit tests, we mocked both components as much as we could. Integration tests, on the other hand, will come a step closer to the real environment as we will instantiate the whole plugin and inspect behaviour of the plugin as a whole.
Also, we will start a Wiremock server which will act as a mock API Geoapify server. This way, we will not need to patch any of our API calls but will only redirect all of our API calls to the Wiremock API URL. Arguably, the Wiremock setup might seem like an overkill, but I wanted to mention this possibility in case you would need it. If your plugin does not interact with third-party data sources, you will probably skip this step.
In the docker-compose.test.yml, add the following:
1
2
3
4
5
6
7
8
9
10
11
12
13
14
15
16
17
18
19
20
21
22
23
24
25
26
27
28
29
30
31
32
33
34
35
36
37
38
39

services:
  qgis-unit-test:
    build:
      context: .
      dockerfile: test.Dockerfile
    image: qgisapify/qgis-unit-tests
    environment:
      - TESTS_ROOT=tests/unit
  qgis-integration-test:
    build:
      context: .
      dockerfile: test.Dockerfile
    image: qgisapify/qgis-integration-tests
    environment:
      - TESTS_ROOT=tests/integration
    depends_on:
      # this is a crucial part: we say that the integration
      # tests depend on the Wiremock server being up and running
      wiremock:
        condition: service_healthy
  wiremock:
    image: wiremock/wiremock:3.6.0
    ports:
      # 8443 will be the port you will use in tests
      - "8443:8443"
    command: ['--global-response-templating', '--port', '8443', '--https-port', '8444', '--verbose']
    volumes:
      # copy mocked responses from tests/sources/wiremock/__files to the test container
      - ./tests/sources/wiremock/__files:/home/wiremock/__files
      # copy response mappings from tests/sources/wiremock/mappings to the test container
      - ./tests/sources/wiremock/mappings:/home/wiremock/mappings
    healthcheck:
      # A smoke HC, really, but we have nothing better out of the box as of June 2024
      test: ["CMD", "curl", "localhost:8443/__admin/mappings"]
      interval: 5s
      timeout: 10s
      retries: 5
Now for the tests themselves. As always, we need to prepare user input. This time, we will not tinker with QT components directly but will simulate user input using a QT bot which will simulate user input for us. We will then submit the form (using a left mouse click generated also by QT bot) and inspect what is inside the result table:
1
2
3
4
5
6
7
8
9
10
11
12
13
14
15
16
17

def test_form_submit_fills_result_table_view(qgisapify: GeoapifyPlugin,
                                             qtbot):
    qtbot.keyClicks(
        qgisapify.dockwidget.addressLineEdit,
        "Wimbledon, UK"
    )
    qtbot.keyClicks(
        qgisapify.dockwidget.apiKeyLineEdit,
        "615fefff9d32d38057bf33d8a94eecff"
    )
    qtbot.mouseClick(
        qgisapify.dockwidget.searchButton,
        Qt.MouseButton.LeftButton
    )
    assert qgisapify.dockwidget.resultTableView.model()._data == '...'
Notice that the test case accepts an instantiated plugin which we set up as a pytest fixture. You can view the whole test suite in the plugin repository.
Worker Threads
There is yet one big flaw in our implementation. The Geoapify API call is executed in the same thread which refreshes the QGIS GUI which is the “default” thread from our point of view.
Why is that a bad thing?
If your logic is swift enough, you will not notice any changes whatsoever, but the chances are your real logic will have a bit of delay. During this delay, the _ whole QGIS_ becomes unresponsive because the responsiveness is determined by how often the QT GUI thread can refresh its state and react to user prompts (key presses, mouse clicks, cursor movement, …).
That’s why it’s always a good practice to run your code separate from the QT GUI thread in a dedicated thread. We call such threads worker threads. By separating concerns, we will make sure that our plugin won’t block the whole QGIS application.
Multi-threading in Python, especially in CPython, is a bit tricky1, but what is important to us is that QT provides us with a thread pool which is dedicated exactly for worker threads. Let’s get to work! :)
First of all, we will create a wrapper around QRunnable2 which will enable us to have fine-grained information about the worker thread lifecycle, based on QT signals which we’ve already discussed in this series:
1
2
3
4
5
6
7
8
9
10
11
12
13
14
15
16
17
18
19
20
21
22
23
24
25
26
27
28
29
30
31
32
33
34
35
36
37
38
39
40
41
42
43
44
45
46
47

from PyQt5.QtCore import QRunnable, QObject

class QgisapifyQRunnableSignals(QObject):
    """
    Defines the signals available from a running worker thread.
    """
    finished = pyqtSignal()
    start = pyqtSignal()
    """
    The 'object' parameter here says that the error signal
    will be emitted together with an object parameter which
    can be consumed by the signal listener.

    In this case, this will always be the thrown exception.
    """
    error = pyqtSignal(object)
    success = pyqtSignal(object)

class QgisapifyQRunnable(QRunnable):
    """
    Worker thread
    Inherits from QRunnable to handler worker thread setup, signals and wrap-up.
    """

    def __init__(self,
                 fn: Callable,
                 signals: QgisapifyQRunnableSignals,
                 *args):
        super(QgisapifyWorker, self).__init__()
        self.fn = fn
        self.args = args
        self.signals = signals

    def run(self):
        try:
            self.signals.start.emit()
            r = self.fn(*self.args)
            self.signals.success.emit(r)
        except Exception as e:
            # This is a VERY naive implementation of exception handling
            # modify to your needs
            print(format_exc())
            self.signals.error.emit(e)
        finally:
            self.signals.finished.emit()
To separate our worker logic from the dockwidget UI logic, we will also create a separate class for the worker:
1
2
3
4
5
6
7
8
9
10
11
12
13
14
15
16
17
18
19
20
21
22
23
24
25
26
27
28
29
30
31
32
33
34
35
36
37
38
39
40
41
42
43
44
45
46
47
48
49

class GeocodeSearchWorker:
    def __init__(self,
                 iface: QgisInterface,
                 success_callback: Callable[[GeoDataFrame], None]):
        self._iface = iface
        self._threadpool = QThreadPool.globalInstance()
        self._layer_import_signals = QgisapifyWorkerSignals()
        self._layer_import_signals.start.connect(self._on_start)
        self._layer_import_signals.success.connect(success_callback)
        self._layer_import_signals.error.connect(self._on_error)

    def start(self, search_request: GeocodeSearchRequest):
        """
        This is why we're implementing the worker in the first place.
        We're telling our QgisapifyWorker to call the _search method
        which will accept search_request as its parameter.
        """
        worker = QgisapifyQRunnable(self._search,
                                    self._layer_import_signals,
                                    search_request)
        self._threadpool.start(worker)

    def _search(self, search_request: GeocodeSearchRequest):
        """
        Logic to be executed inside the worker.
        """
        geoframe = search(api_key=search_request.api_key,
                          query=search_request.address,
                          api_prefix_url=search_request.api_prefix_url)
        if geoframe is not None:
            return normalizeGeoDataFrame(original_df=geoframe)
        else:
            QgsMessageLog.logMessage("Search failed.",
                                     level=Qgis.MessageLevel.Warning)
            raise SearchFailed(search_request)

    def _on_start(self):
        QgsMessageLog.logMessage("Searching for interesting places...", level=Qgis.MessageLevel.Info)

    def _on_error(self, exception):
        print(exception)
        print(format_exc())
        qCritical(str(exception))
        qCritical(format_exc())
        QgsMessageLog.logMessage(
          f"Unknown error: {format_exc()}",
          level=Qgis.MessageLevel.Critical)
I’ve also created a new data class GeocodeSearchRequest so that we pass all form data in one place.
This is how we incorporate our new worker to the dockwidget:
1
2
3
4
5
6
7
8
9
10
11
12
13
14
15
16
17
18
19
20
21
22
23
24
25
26
27

class GeoapifyPluginDockWidget(QtWidgets.QDockWidget, FORM_CLASS):
    ...

    def __init__(self,
                 iface: QgisInterface,
                 settings: QgsSettings,
                 parent=None):
        super(GeoapifyPluginDockWidget, self).__init__(parent)
        ...
        self._worker = GeocodeSearchWorker(
                         iface=self._iface,
                         success_callback=self._successCallback)

    def _successCallback(self, geoframe: GeoDataFrame):
        self.resultTableView.setModel(GeopandasModel(data=geoframe))

    def _handleSearchButtonClick(self):
        address = self.addressLineEdit.text()
        api_key = self.apiKeyLineEdit.text()

        request = GeocodeSearchRequest(
                    api_key=api_key,
                    address=address,
                    api_prefix_url=...)
        self._worker.start(request)
I also needed to rework my test suites a bit but most of the changes were technical. As always, you can read the test suites for yourself.
We can now run automatic tests which validate our implementation corectness. Next, we will create a point vector layer based the result table contents which was our main goal of the plugin.